Your upcoming Camino is on the horizon and it’s time to start preparing
Because, even if the Camino de Santiago is not the Pacific Crest Trail and you will not be carrying a heavy backpack, it’s always a (very) good idea to prepare for your hike before you hit the trail. The good news is that preparing for the Camino does not require a huge investment in time, resources or sore muscles.
We suggest you start your training at least three months prior to your tour.
Getting ready for your Camino: Training for your Hike
- Go for (at least) a half-hour walk, ideally three or four times a week. The more you get out, the stronger you will feel. However, you also must feel like you are exercising, so remember to walk as briskly as possible.
- Gradually build up your endurance and training frequency. Start with two weekly outings and slowly add more as you feel stronger. If 30 minutes is a lot at the beginning, then try 20 and work from there. You should feel tired but satisfied at the end of a walk, not exhausted and miserable.
- Carry a small daypack on your walks that does not weigh more than 4 pounds (1.8 kilos). It is highly unlikely that you will be carrying more than this in your daypack.
- Wear the same footwear you will wear on tour, even if you are training on sidewalks. New shoes on a hike usually result in painful blisters.
- Your aim is to comfortably walk 2.5 miles (4 kms.) in an hour on a level terrain. Here is some more information with some short videos to help you get ready: https://www.cicerone.co.uk/how-to-get-hill-fit-and-train-for-long-distance-walking
Getting ready for your Camino: Some simple fitness exercises
We’d like to address strengthening other muscles, which can help reduce soreness and prevent injuries, especially around your ankles. Remember that you should always adapt the exercises described below to your own capacity and ability. If you are not comfortable doing an exercise, then drop it! Your aim is to improve your muscle tone, not to become an athlete.
- Get a resistance band to strengthen your gluteal muscles and help stabilise your knees and hips. One good exercise is to tie the resistance band around your legs, just above the knees and walk sideways while maintaining the band’s tension between your shins.
- Do basic crunches, squats and/or lunges to improve your balance and strength. Find a simple routine that works for you. Remember that your aim is to make your hike more enjoyable and prevent injuries.
- Any cardio exercise helps build your lung capacity, which means happier hiking. Treadmills and stationary bikes are great if you have access to them. Again, frequency and duration should increase gradually, if at all.
- If you are lucky to live by a beach, walking in sand is a good work out.
- Find an exercise routine adapted to you, and not the other way around.
Getting ready for your Camino: Footwear and your hiking boots
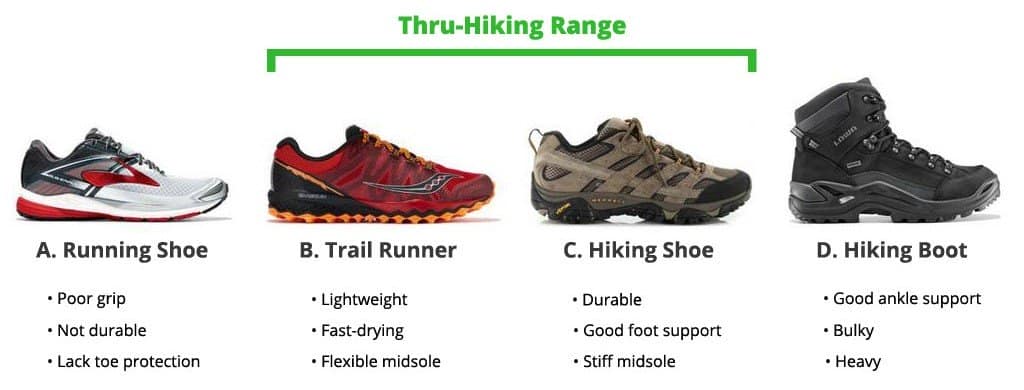
The following is a universal truth: No matter how fit and prepared you are, your footwear will make or break your hike. This means that your footwear will help protect and support your feet and ankles, as well as help avoiding other problems, such as blisters. Footwear that doesn’t fit well, is not appropriate to the season and/or terrain, or has not been broken in is a recipe for disaster.
We have found that waterproof hiking shoes do the job on the Camino, although some pilgrims lean towards the lighter trail-runners. Pilgrims that require a bit more ankle support may prefer a mid-cut boot. In the middle of the summer, and depending on where you are hiking, hiking sandals are wonderful. Bear in mind that we do not usually hike in the winter nor in the high mountains, so heavy winter hiking boots are not appropriate. Your footwear should be waterproof, light and allow your feet to breathe. If you are not sure about the weather and terrain before your Camino, do not hesitate to ask us!
Now that you’ve bought your boots, give yourself at least a couple months to break them in. Showing up with brand new hiking boots spells blisters. We also recommend getting footwear a bit larger than your actual size, your toes will appreciate this on the downhills.
Fresco tip: It may not sound to glamorous, but wearing your boots on board your flight avoids potential problems if your luggage doesn’t arrive with you.
Not sure where to start, your local REI or any other specialised outdoor recreation store is a good option: https://www.rei.com/c/womens-footwear We also suggest purchasing your boots in a shop and not over the Internet as, not only can sizes can be tricky but also, every boot feels different.
Getting ready for your Camino: Trekking poles
At Fresco, we love trekking poles and always suggest using them, especially if you are concerned about your knees, ankles and/or balance. Camino trails are usually well groomed and easy. That said, there will frequently be times when you may appreciate an extra set of limbs to hold and balance yourself. But most important, quoting Harvard Health Publishing:
”Going downhill is much harder on the hip and leg muscles and puts compressive forces on the knees that are three or four times higher than the forces experienced when walking on level ground. A variety of biomechanical experiments done in carefully controlled lab conditions have shown that hiking poles can significantly reduce those forces, as well as movement in the joints that creates strain.”
If you are going to use poles, we suggest training with them when possible, even if you are not on hills. On flat terrain, the poles should be adjusted so that your elbow is bent at a right angle. Use the straps so that you can keep a relaxed and loose grip. On hills, adjust the poles accordingly (longer on the downhills and shorter on the uphills).
Fresco tip: Make sure your poles are collapsable, even if you plan to check in luggage; airlines can be picky when it comes to check in and carry on sizes.
Not sure where to start, Amazon can be a good starting place: https://www.amazon.com/s?k=trekking+poles&ref=nb_sb_noss (and there’s no reason to go beyond the 30-40 dollar range if you are an occasional hiker).
Getting ready for your Camino: Stretching
Walking the Camino de Santiago, or any long hike, puts a real physical strain on your body. Spending just a few minutes stretching before and after your hike will lessen soreness, decrease the risk of cramps, and will help prevent injuries.
We’d like to encourage you to try these stretches and make your adventure more enjoyable.
Dynamic pre-hiking stretches
Dynamic, pre-hiking stretches are essential to get your muscles warm and ready to move. Start by getting your heart rate up with simple exercises such as marching in place or swinging your arms.
Shoulder Rolls: Stand tall with your arms on your sides and slowly roll your shoulders forward, up, back and down. Reverse rotation. Repeat 10 times each direction.
Standing Quad: Stand with legs hip width apart. Bend your leg at the knee so that your foot touches your backside and grab your foot. Make sure your knee is pointing to the ground. Hold for 30 seconds and switch sides.
Lunges: Stand tall and step your right foot forward into a lunge. Hold the stretch and repeat on opposite side. Once in lunge position, gently twist towards the right side. Add this body twist for a stronger core.

Static stretches for after your hike
While your muscles are still warm, don’t forget to finish your long hike by stretching again. This time, these these static stretches help you cool down by decreasing muscle tension and increasing muscle relaxation.
Crescent Lunge: Right leg forward, knee over ankle and left leg straight behind. Lift your chest and raise your arms overhead and hold for 30 seconds. Repeat with the other leg.
Straddle Stretch: Take a wide stance and bend body forward at your waist with straight legs. Hold your elbows and dangle head between legs. As your body eases into this stretch, shift towards one side reaching towards knee, shin or toe. Hold for 30 seconds. Slowly shift towards the other side for another 30 seconds. Move back to the middle and slowly lift your body up.
Calves Stretch: Rest hands on thighs. Extend back leg and keep back heel flat on ground. Hold for 30 seconds and change foot.